A website represents an opportunity to take your business to the next level. A chance to establish yourself as an authority in your niche.
You can use your site to create awareness or share your passions. Generate an extra income or come up with something that might revolutionize the internet as you know it. These are just some of the possibilities that await the right website owner with enough dedication to see things through.
Of course, it helps if you have access to the right tools from the very beginning. For example, when you combine Cloudflare and WordPress, you are essentially combining two very powerful online entities. One is a global network giant which aims to make the Internet faster and safer for everyone. The second is the world’s most popular, search engine friendly blogging platform.
Now, just think about what you can achieve when you run a website on a platform with the best reputation in terms of website development, only to receive on-site and off-site performance optimization from a content delivery network that effectively increases the loading speed while boosting security?
What Is Cloudflare?
Cloudflare makes your website faster and more secure. Websites are usually hosted at just one location. But, with Cloudflare, copies of your site contents are distributed to a network of servers all over the world. This content delivery network makes your site much faster because your content is now much closer to your visitors.
In case your site’s static assets got deleted or corrupted, your visitors wouldn’t be able to notice any changes as Cloudflare would serve cached contents stored in hundreds of locations worldwide. This way you can continue serving your customers while in the meantime you can fix all of your site’s issues.
Advanced CDNs like this were so expensive and only large corporations could afford them in the past. Thankfully, now you can harness the power of one such CDN on your website for free.
Once you have properly configured your site with Cloudflare (after reading this guide) you will gain access to a dedicated admin panel. You will also gain access to several reports on performance, security, and analytics.
Cloudflare also offers its users with professional and business paid plans. With a paid plan, you will experience faster page loads and advanced DDOS protection. In addition, you will get access to Argo routing, real-time analytics, mobile optimization and much more.
Before attempting any installations or integrations, it is important to understand what you are adding to your website. In this case, Cloudflare serves three main purposes. They are:
- Increased Website Loading Speed
- DDoS Protection
- Domain Name Service
Speed and security are crucial factors for any website. Why? Because users hardly ever tolerate extended loading times or breaches.
Two or three seconds is what they will typically allow the website to present a fully loaded page, which is challenging when the distance between the user and the server stretches across the ocean.
Cloudflare increases your website performance by providing users with cached pages. These pages are hosted on servers across the globe, and the user is sent automatically to the closest one.
At the same time, Cloudflare offers protection against DDoS cyber attacks, as well as a domain name service with impressive response time.
What Is WordPress?
WordPress is an open source CMS/blogging platform. It empowers you with the ability to build and customize websites without any knowledge of coding. It is as user-friendly as it gets, and it still allows for the development of high-quality and competitive sites, all thanks to thousands of free/premium WordPress themes and plugins.
Just a little bit of research will show that WordPress has been dominating the internet with its innovative updates to an already powerful platform.
How To Setup WordPress Website With Cloudflare
In certain cases where WordPress hosts have partnered with Cloudflare, you can integrate Cloudflare with a single click from your hosting’s CPanel. But assuming you are on VPS or a Cloud Hosting and need to handle the installation manually, this is how you do it:
1. Register
Go to the Cloudflare website and click on the “Sign Up” link. Now enter your email address and the password to create your account for free.
2. Querying DNS Records
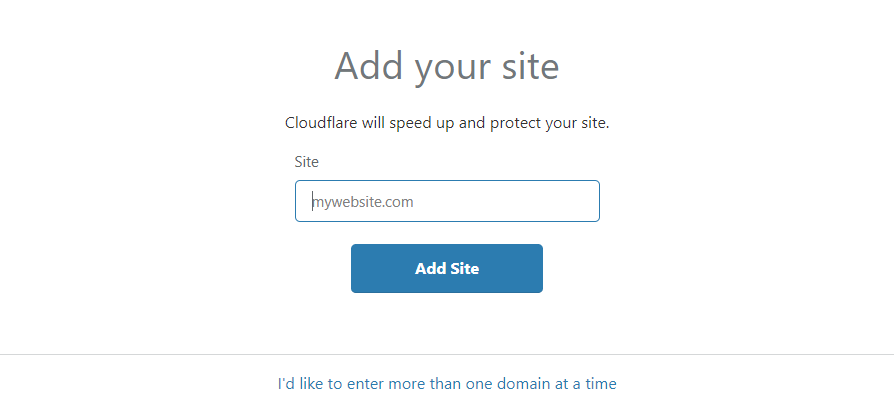
After successful signup, you will be asked to enter your site’s address, for example, your-domain-name.com.
note: If you want to connect multiple domains, you can do so by following the Automation guide.
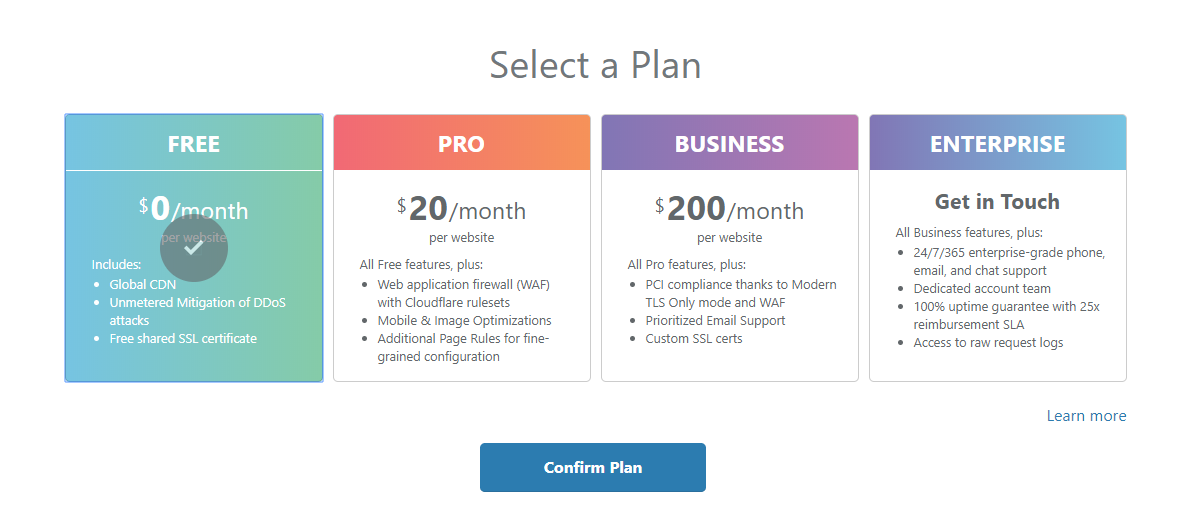
The next step is to wait for Cloudflare to automatically query the DNS records of your domain. Once it has gathered DNS records you need to click on the “Next” button. Now, this is the point you will be presented with the different subscription packages they offer.
If you have a site with low-medium traffic or just wanting to test this CDN platform, stick to the free plan.
The free Cloudflare plan offers everything required to properly optimize a low to medium traffic website.
You always have the option to upgrade at a later stage when you feel more comfortable.
3. DNS Records Verification
After selecting your plan, you will be required to confirm the DNS records.
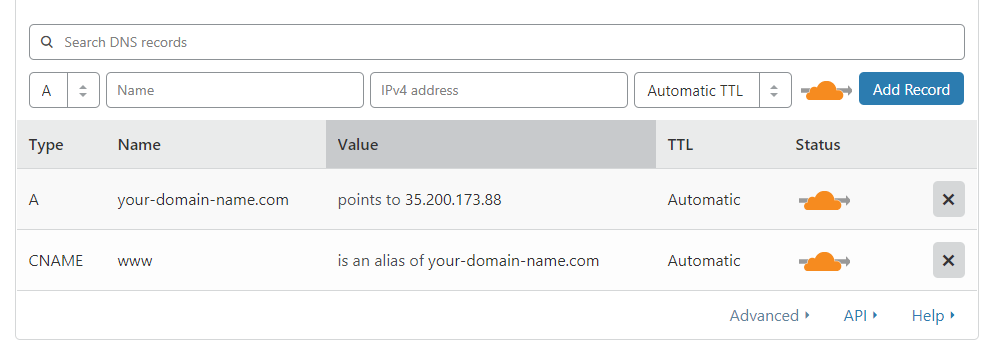
If you wish to edit to enter any custom records, you can do so by adding appropriate values in the provided fields.
4. Change your Nameservers
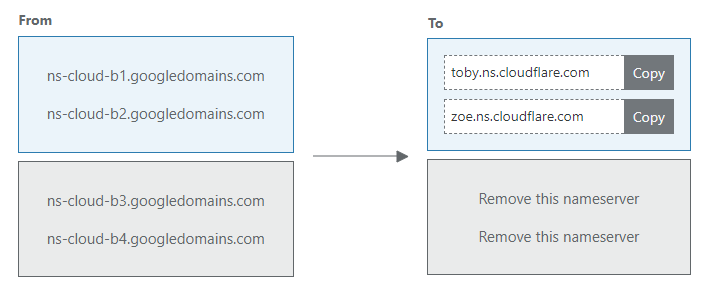
Now, in order for Cloudflare to act as a reverse proxy for your site, you need to make few changes.
- You need to login to your domain management panel.
- You need to change your domain’s current nameservers with the one provided by Cloudflare.
Remember, DNS related changes can take as long as 24-hours to propagate globally. So, you need to keep patience.
note: You can always check the changes using a free tool called “whatsmydns”.
5. Configure Settings For WordPress
After you have completed the above steps, it’s time to head to your WordPress dashboard. Here you need to install the official WordPress plugin. It’s a free addon which will automatically configure Cloudflare’s settings to work best with your WordPress site.
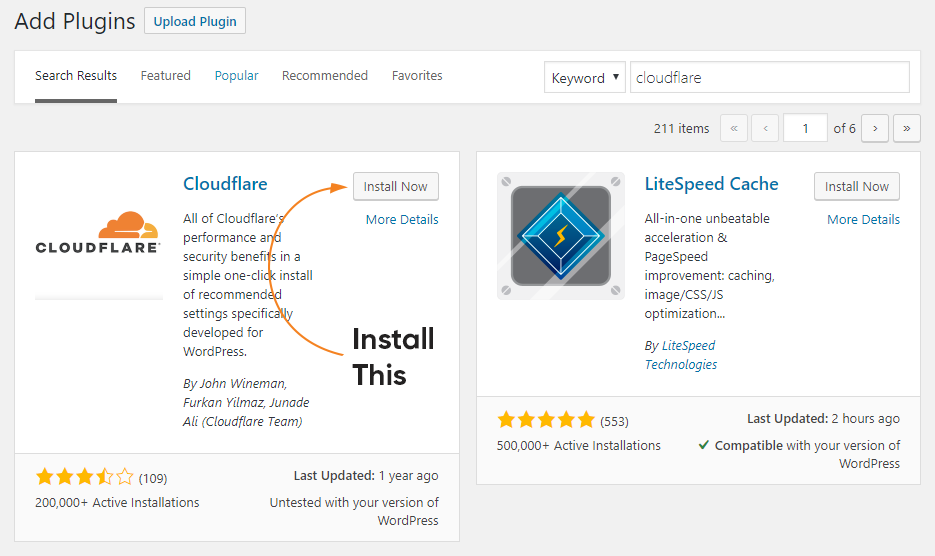
How to install the plugin:
- Open your site’s administration panel.
- Put your cursor on the “Plugins” menu and then click on “Add New” link.
- In the search field, enter “Cloudflare” and then press enter key.
- Install and activate the appropriate plugin as shown in the image attached below.
Once you have installed and activated the plugin, you can access its settings panel. Navigate to (Settings > Cloudflare) in your WordPress dashboard to make your changes.
Next, you will need to login to your Cloudflare’s account by clicking on the “Sign in here” link. Now, you will be required to enter the email address with which your domain is connected to Cloudflare and the Global API key. You can get your Global API by visiting this link.
Once you are logged-in to your account, you will see options to control the baseline settings. Although it’s not suggested, you can always make adjustments.
6. WordPress Specific Performance Settings
This is the last step, and it involves configuring the WordPress-specific page rules and settings for the best performance.
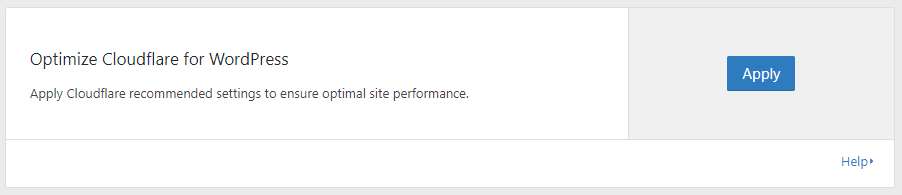
All you have to do now is to click on the “Apply” button provided under the “Optimize Cloudflare for WordPress” section. Now Cloudflare will automatically make certain adjustments to security settings. It will also adjust settings related to Cache, Minification, etc for improved performance.
You can read more about the automatic optimization on this official support guide.
Remember you have 100% control over your site. You can always disable this plugin or change the selections later by visiting your Cloudflare’s dashboard.
Enjoy The Combination Of Cloudflare And WordPress
At this point in time, and if the installation went smoothly, the servers storing the cached versions of your website pages should be available in 24-hours.
And the result is that users across the globe can access your pages with a lot more speed & security.
If you’re having trouble to set up Cloudflare with WordPress, please leave a comment and we’ll try to help you.
Patricia Williamson
Latest posts by Patricia Williamson (see all)
- How to Set Up Cloudflare with WordPress - March 18, 2019
Thanks so much for explaining how to connect a WordPress website to Cloudflare, Patricia.
I also enjoyed reading about the benefits of doing so. Security and speed are two essential things when it comes to online presence.